section name header

Arterial line insertion

An arterial line provides access for invasive arterial pressure monitoring (e.g., continuous blood pressure monitoring) and can be used to obtain blood samples when frequent blood draws are indicated, including arterial blood gases.

A closer look at arterial insertion sites

Typically, a standard 18G to 20G over-the-needle catheter is inserted into a peripheral artery, usually the radial, brachial, or femoral artery. The radial artery is the preferred site.

Choosing an arterial catheter site

When your patient needs arterial pressure monitoring, an arterial catheter will probably be inserted in the radial artery. If these sites are unsuitable, the catheter may be inserted in the femoral, brachial, axillary, or dorsalis pedis artery. Regardless of the site chosen, it should have an artery large enough to accommodate the arterial catheter without impeding distal blood flow. It should also be free of infection or traumatic injury proximal to the insertion site. The insertion can also be facilitated using ultrasound-guided vascular access.

Advantages and disadvantages of each site are described in the following table.

Insertion siteAdvantagesDisadvantages
Radial artery
  • Easy to locate

  • Good collateral circulation to the hand provided by the ulnar artery

  • Easy to observe and maintain

  • Anatomically stable (The radius acts as a natural splint.)

  • Comfortable for the patient

  • Relatively small lumen, possibly making catheter insertion difficult and painful

  • High risk of thrombus formation with prolonged use due to the small vessel size and small-gauge catheter required to cannulate it

  • Risk of nerve injury due to hematoma formation or trauma during catheter insertion

  • Risk of false high-pressure readings because of the site's distance from the heart

Brachial artery
  • Larger than the radial artery and easily located

  • Easy to observe and maintain

  • Good collateral circulation provided by blood vessels at the elbow joint

  • Control or prevention of bleeding usually possible by direct pressure

  • Risk of median nerve damage during catheter insertion

  • Difficult to immobilize (The patient's elbow must be splinted, which may result in joint stiffness.)

  • Risk of thrombosis if the artery is small (in children and small women) or if the patient has low cardiac output.

Femoral artery
  • Possibly the easiest artery to locate and puncture during an emergency (when peripheral pulses are nonpalpable) because of its large lumen

  • Anatomically stable (The femur acts as a natural splint.)

  • Difficult catheter insertion in the presence of atherosclerotic plaque (In addition, the plaques may embolize if disturbed.)

  • Possible damage to the nearby femoral vein and major nerves during catheter insertion

  • Possible tissue damage if the artery occludes because of inadequate collateral circulation

  • Difficulty securing catheter

  • Difficulty controlling or preventing bleeding

  • High risk of infection with prolonged use because of close proximity to perineal area

Axillary artery
  • Fewer complications with prolonged use because of large size

  • Reduced risk of distal arterial insufficiency because of adequate collateral blood flow

  • Useful in patients with severe peripheral vascular disease

  • Difficult catheter insertion and uncomfortable for the patient

  • Risk of hematoma formation increases the possibility of neurovascular complications.

  • Risk of cerebral air or clot embolism during flushing of the system or blood sampling

Dorsalis pedis artery
  • May be used when other sites cannot be used because of burns or other injuries.

  • High risk of thrombosis because of the small vessel size and small-gauge catheter required for insertion

  • Uncomfortable for the patient and difficult to immobilize (The patient will not be able to stand or walk until the catheter is discontinued.)

Allen test

Before accessing the radial artery for peripheral arterial line insertion, the patient's ulnar and radial circulation must be checked for collateral circulation. Why? If the radial artery is blocked by a blood clot (a common complication of arterial lines), the ulnar artery alone must supply blood to the hand. A simple, reliable test of circulation can be done by performing the Allen test, which demonstrates how well both arteries supply blood to the hand.

Performing the Allen test

Follow these steps to perform the Allen test:

  1. Rest the patient's arm on a flat surface, such as having the patient rest their arm at their side on the mattress or on the bedside stand. Support the patient's wrist with a rolled towel. Have them clench their fist. Then, using your index and middle fingers, palpate and then press both the radial and ulnar arteries. Hold this position for a few seconds.

  2. Without removing your fingers from the patient's arteries, ask them to unclench their fist and hold their hand in a relaxed position. The palm will be blanched because pressure from your fingers has impaired the normal blood flow.

  3. Release pressure on the patient's ulnar artery but keep pressure on the radial artery, as shown below. Observe the palm for a brisk return of color or "flushing," which should occur within 7 seconds (showing a patent ulnar artery and adequate blood flow to the hand). If color returns in 7 to 15 seconds, blood flow is impaired; if color returns after 15 seconds, consider the flow inadequate.

If blood flow is impaired or inadequate, the radial artery in this hand should not be used. At this point, proceed with the Allen test on the other hand. If neither hand colors or flushes, consider another site, such as the brachial artery, for catheter insertion.

Caring for arterial catheters

There are three steps to basic care for arterial catheters:

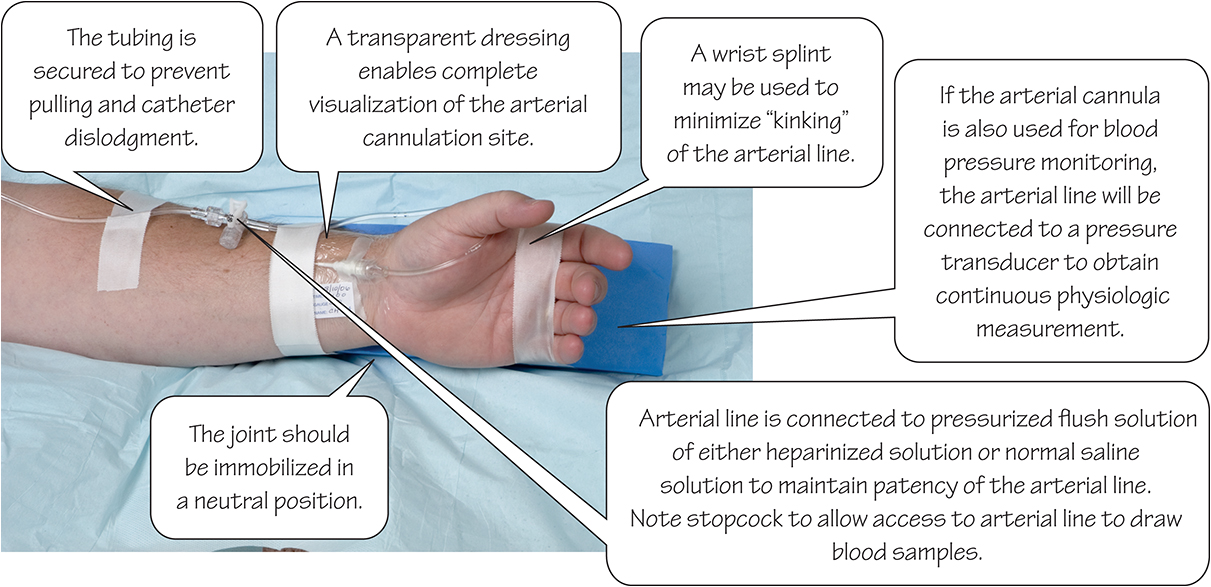
  1. Dressing: After insertion of the arterial catheter, dress the insertion site and change it according to facility policy. Sterile dressing changes are recommended. Transparent dressings are typically used over the insertion site to enable complete visualization of the site. This breathable film allows oxygen in and moisture vapors out, while also providing barrier protection.

  2. Immobilizing: The body part where the catheter is placed will then need to be immobilized. The joint or limb should be placed in a neutral position to prevent joint flexion or extension, which may result in kinking or dislodgment of the catheter. If the radial artery has been used, take care not to hyperextend the wrist, which could result in nerve or neuromuscular injury. Assess the limb with the arterial cannulation for any associated pressure points when immobilizing the extremity. Regularly assess the functioning of the arterial line to prevent kinking.

  3. Assessing: The arterial catheter site must be assessed every hour. Include the following in your assessment:

    • Inspect the arterial catheter insertion site for redness, drainage, bruising, or blanching. (The benefit of using a transparent dressing becomes apparent at this step.) Palpate the area for firmness or swelling.

    • Assess circulation of the extremity in which the arterial catheter has been placed by evaluating skin color, temperature, capillary refill, distal pulses (if applicable), and motor and sensory function.

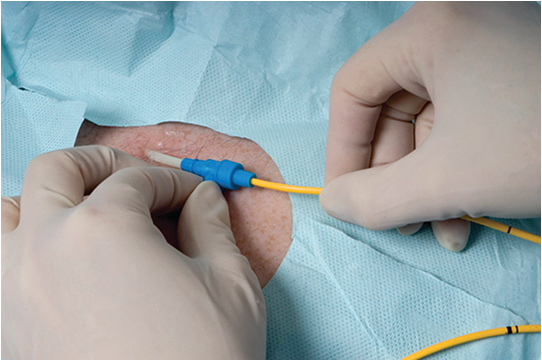
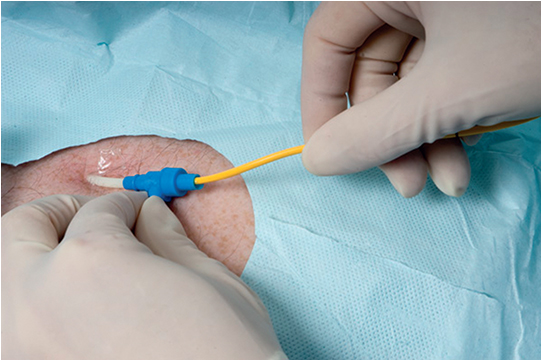
A closer look at an arterial line

This photograph shows an arterial line taped in place in the radial artery. (Flush is shown in Chapter 4.)

    Central venous and pulmonary artery catheter insertion

    Central venous and pulmonary artery catheter insertion sites

    The most common sites for percutaneous insertion of a central venous (CV) or pulmonary artery (PA) catheter include the internal jugular, subclavian, and femoral veins. The right internal jugular vein is considered the safest insertion site. Although the subclavian vein is easily accessed, its use carries certain risks. The most significant risk is pneumothorax, resulting from puncturing the lung at a level above the clavicle during catheter insertion. In addition, using the subclavian vein may cause the catheter or the introducer to bend or kink during insertion. Although the femoral vein is easily accessible, use of this site carries an increased risk of infection because of the proximity to the groin.

    Other access sites may include the antecubital vein.

    Central venous and pulmonary artery catheterization

    CV and PA catheterization can help you assess a patient's cardiovascular and pulmonary status, obtain blood samples, and infuse solutions. Inserted in a surgical, sterile procedure in the jugular, subclavian, femoral, or basilic vein, the catheter is flow directed, allowing venous circulation to carry it through to a position in or near the right atrium (for CV catheters) or through the right atrium and ventricle to the PA (for PA catheters).

    Placement can be guided by ultrasound using transthoracic echocardiography or radiographic imaging using fluoroscopy. In addition, the provider inserting the PA catheter will be guided by waveforms as the catheter transverses through the right atrium, right ventricle, and into the PA.

    Choosing a central venous or pulmonary artery catheter insertion site

    The following table highlights the advantages and disadvantages of the most common sites used for CV or PA catheter insertion. Catheter-related infection is the most common risk at every insertion site, occurring in up to 5% of cases.

    Insertion siteAdvantagesDisadvantages
    Internal jugular vein
    • Provides a short, direct route to the superior vena cava or right atrium

    • Carries a low risk of catheter displacement

    • Has a lower incidence of pneumothorax or perforation of an artery than with a subclavian vein

    • Has a lower risk of thrombotic complications because rapid infusion rates may be used

    • Several complications, including:

      • air embolism

      • common carotid artery perforation

      • perforation of the trachea or endotracheal (ET) tube cuff

      • pneumothorax (more common in the left internal jugular vein)

      • injury to the thoracic duct (applicable only to left internal jugular vein)

    Externa jugular vein (peripheral access)
    • Is easily accessible because of its superficial location

    • Carries a low risk of pneumothorax or puncture of the carotid artery

    • Difficult passage to the central veins

    • Increased risk of thrombosis because infusion rates must be slower

    • Difficulty maintaining a sterile dressing, especially with the presence of a tracheostomy

    • Several possible complications, including:

      • carotid artery perforation

      • pneumothorax

      • displacement into axillary vein

    Subclavian vein
    • Is easily accessible

    • Enables easy maintenance of a sterile, intact dressing

    • Allows the patient to move their neck and arm freely

    • Carries minimal risk of catheter displacement after it is secured

    • Carries a reduced risk of thrombosis because rapid infusion rates are allowable

    • Several possible complications, including:

      • air embolism

      • subclavian artery perforation

      • life-threatening blood loss (because pressure cannot be applied to an anterior subclavian tear)

      • pneumothorax

      • phrenic or brachial nerve injury

      • ET tube cuff perforation

    Femoral vein
    • Is easily accessible

    • Enables greater ease of insertion in patients with tortuous subclavian and jugular veins (such as in older adult patients)

    • Carries no risk of pneumothorax and a minimal risk of air embolism

    • Possibly difficult to identify in patients with obesity

      • Increased risk of infection because of proximity to the groin

      • Difficulty maintaining a sterile, intact dressing

      • Increased risk of catheter displacement because the site is difficult to immobilize

      • Several possible complications, including:

        • inadvertent cannulation of local smaller veins

        • thrombosis

    Basilic vein (peripheral access)
    • Carries no risk of pneumothorax or major hemorrhage

    • Enables greater control in bleeding from the site

    • Difficult to identify in patients who are obese or edematous

    • Possible difficulty advancing the catheter to the central veins from this distal site

    • Increased risk of catheter displacement

    • Several possible complications, including:

      • thrombosis

      • venous spasm

    Insertion of the catheter

    Before catheter insertion, assess the patient's vital signs, obtain consent and explain the procedure, and set up the appropriate tubing.

    CV and PA catheters share the same approaches to insertion-a surgical cutdown technique or a percutaneous technique using sterile technique.

    A surgical cutdown involves identifying the vein to be used for insertion, administering a local anesthetic, and making a small incision directly above the vessel. The catheter is then inserted by direct needle puncture of the vessel, or by creating a tiny incision in the vessel, through which the catheter is inserted and then sutured in place. Surgical cutdown is typically performed for central catheters inserted through the basilic vein or when percutaneous access is not possible.

    Introducer kit

    The more commonly used percutaneous technique involves the use of an introducer to access the vessel. A locator needle is first inserted in the vein, and a guide wire is threaded through the needle. The needle is removed, and an introducer catheter is inserted over the wire. Then, the wire is removed, leaving the introducer in place in the blood vessel. The CV or PA catheter is then inserted through the introducer sheath. Prepackaged introducer kits, such as the one shown below, are available to facilitate gathering and preparation of equipment.

    Patient positioning

    Proper patient positioning during CV or PA catheter insertion is essential to enable optimal access to the site and prevent contamination. These guidelines will help you position your patient depending on the insertion site you are using:

    • Place the patient in the Trendelenburg position to dilate the veins and reduce the risk of air embolism. (This position is not necessary if you are using the femoral vein site.)

    • For subclavian insertion, place a rolled blanket or towel lengthwise between the shoulders to increase venous distention.

    • For jugular insertion, place a rolled blanket or towel under the opposite shoulder to extend the neck, making anatomic landmarks more visible.

    • Have the patient wear a mask or turn the patient's head away from the insertion site to prevent possible contamination from airborne pathogens and to make the site more accessible.

    Positioning for subclavian vein access

    For subclavian vein access, in addition to placing a rolled blanket or towel lengthwise between the patient's shoulders, the patient should be positioned with head turned away from the access site with the chin pointed upward, as shown here. In addition, have the patient wear a mask to reduce risk of insertion site infection.

    Potential complications during insertion or after placement

    Potential complications of a PA or central venous pressure (CVP) catheter during insertion may include pneumothorax, air embolism, arterial puncture, or bleeding. In addition, cardiac dysrhythmias may occur during PA catheter insertion. After-placement complications of CVP and PA catheters can include thrombosis and infection.

    A closer look at catheter insertion

    The following photographs show a PA catheter being inserted through an introducer during a percutaneous insertion procedure.

    1. After the introducer is in place, the PA catheter may be inserted.

    2. Because the introducer completely occupies the puncture sites at the skin and blood vessel, there is minimal bleeding from the site.

    3. The PA catheter is inserted 5" to 6" to reach the superior vena cava from the internal jugular or right subclavian insertion sites. A longer length is required from the femoral site.

    Changing a central venous dressing

    According to the Centers for Disease Control and Prevention (CDC), expect to change your patient's CV dressing every 48 hours if it is a gauze dressing and at least every 5 to 15 days if it is transparent or if the integrity of the dressing is compromised. Sterile dressing changes are indicated whenever the dressing becomes soiled, moist, or loose. The following illustrations show the key steps you will perform.

    1. Put on a mask and clean gloves and remove the old dressing (as shown below) by pulling it toward the exit site of a long-term catheter or toward the insertion site of a short-term catheter. This technique helps you avoid pulling out the line. If a chlorhexidine disk is in place, remove it. Remove and discard your gloves.

    2. Put on sterile gloves and clean the skin around the catheter with an antimicrobial skin cleanser (usually chlorhexidine), using a vigorous side-to-side motion (as shown below).

    3. Allow the skin to dry completely. Apply a new chlorhexidine disk if indicated.

    4. After the solution has dried, cover the site with a dressing, such as a transparent semipermeable dressing. Write the time and date on the dressing. Document the dressing change including the appearance of the catheter insertion site.

    Indications for central venous pressure or pulmonary artery catheter

    Both types of catheters can be very useful to evaluate volume status in patients who are acutely ill. The catheters can also be useful in determining whether the patient has fluid-volume status changes and left ventricular heart dysfunction. The PA catheter can specifically provide continuous monitoring of the PA pressure and can be used to obtain cardiac output. The pressure monitoring provided by the CVP or PA catheter can be useful in guiding the use of fluid therapy and/or vasoactive medication (e.g., dopamine) titration.

      Quick quiz

      Able to label?

      In the illustration, label the arterial insertion sites.

      See Answer

      True or false
      1. An arterial line can measure CVP.
        1. True
        2. False
      2. Flush solutions used to maintain patency of arterial lines ALWAYS REQUIRE heparin.
        1. True
        2. False
      Multiple choice
      1. Which of the following is the most common insertion site for arterial cannulation?
        1. ulnar artery
        2. brachial artery
        3. radial artery
        4. internal carotid artery
      2. When a PA catheter is used to obtain a pulmonary artery wedge pressure (PAWP), an indirect pressure reading is obtained for which of the following?
        1. left atrial pressure
        2. pulmonary arterial pressure
        3. superior vena cava pressure
        4. coronary artery pressure
      3. Which of the following parameters can be obtained from the PA catheter?
        1. blood pressure
        2. stroke volume
        3. oxygen saturation
        4. pulmonary artery mean pressure

        Selected references